
This article will cover:
- How to install and configure CrowdSec to prevent attacks by SSH or by your Apache web server
- How to configure a CrowdSec dashboard on Bleemeo, to see the number of banned IPs and the ongoing attacks
- How to create an alert to be notified when your server is under attack.
What is CrowdSec?
CrowdSec is an open-source software that allows you to detect peers with malicious behaviors and block them from accessing your systems. It benefits from a global community-wide IP reputation database.
Attackers can then be prevented from accessing your resources by deploying bouncers. They are in charge of acting upon actors that triggered alerts: they can block the attacking IP, serve a 403 Forbidden response, and much more.
Installing CrowdSec
Installing CrowdSec is very easy using their installation script, on Debian and Ubuntu, you can use the following commands:
curl -s https://packagecloud.io/install/repositories/crowdsec/crowdsec/script.deb.sh | sudo bash
sudo apt install crowdsec
Let’s also install our first bouncer, a firewall bouncer to ban attacking IPs.
sudo apt install crowdsec-firewall-bouncer-iptablesOn other platforms, follow the CrowdSec documentation.
You can check that CrowdSec is working using cscli:
cscli scenarios listSCENARIOS
------------------------------------------------------------------------------------------
NAME STATUS VERSION LOCAL PATH
------------------------------------------------------------------------------------------
crowdsecurity/ssh-bf enabled 0.1 /etc/crowdsec/scenarios/ssh-bf.yaml
crowdsecurity/ssh-slow-bf enabled 0.2 /etc/crowdsec/scenarios/ssh-slow-bf.yaml
------------------------------------------------------------------------------------------Two scenarios are installed by default to detect and ban attackers trying to bruteforce your SSH server.
Secure your web server
If you don’t have a web server installed, you can install Apache with:
sudo apt install apache2You should see the default Apache page on http://localhost.
Now let’s secure our Apache web server. For that we will simply install a collection from the CrowdSec hub:
sudo cscli collections install crowdsecurity/apache2Note that this works the same way for an Nginx server, just install
crowdsecurity/nginx instead.
This collection will add a parser to read your Apache logs, and multiple
scenarios to detect common attacks. For example, it will detect attempts to
access sensitive files and folders (.log, .db, .git, …), as well as SQL
injection attempts.
Now we have to tell crowdsec where our Apache log files are located.
cat << EOF | sudo tee -a /etc/crowdsec/acquis.yaml
filenames:
  - /var/log/apache2/*.log
labels:
  type: apache2
---
EOF
Simulate an attack
Now let’s simulate an attack to check that everything is working. First, we should enable the simulation mode, so that we don’t get banned when simulating the attack.
sudo cscli simulation enable --globalWe also need to temporarily disable the whitelist because by default IPs from local networks will never be banned.
sudo cscli parsers remove crowdsecurity/whitelistsReload CrowdSec for the new configuration to be effective.
sudo systemctl reload crowdsecThen we can try to trigger the scenario crowdsecurity/http-sensitive-files by
accessing sensitive files. This scenario is triggered after 4 attempts to access
sensitive files in less than 5 seconds.
URL="http://localhost"

curl "$URL"/.git
curl "$URL"/.htaccess
curl "$URL"/.bashrc
curl "$URL"/.bash_history
curl "$URL"/.ssh
Finally, check the decisions to see if CrowdSec had banned the attacker if the simulation mode was disabled.
sudo cscli decisions list+------+----------+--------------+------------------------------------+------------+---------+----+--------+--------------------+----------+
| ID | SOURCE | SCOPE:VALUE | REASON | ACTION | COUNTRY | AS | EVENTS | EXPIRATION | ALERT ID |
+------+----------+--------------+------------------------------------+------------+---------+----+--------+--------------------+----------+
| 8751 | crowdsec | Ip:127.0.0.1 | crowdsecurity/http-sensitive-files | (simul)ban | | 0 | 5 | 3h59m19.308923305s | 4 |
+------+----------+--------------+------------------------------------+------------+---------+----+--------+--------------------+----------+If you see this line, then everything works as expected!
Set up a dashboard
CrowdSec is now setup correctly and will protect you from attackers, but you won’t be able to see what is currently happening on your server. We can make a custom dashboard on Bleemeo to see the status of CrowdSec and graph some relevant metrics.
If Glouton is not installed on your server yet, you can sign up on https://bleemeo.com/trial/ and follow the documentation to install the agent.
Agent configuration
Configure the Bleemeo agent to scrap CrowdSec’s metrics.
cat << EOF | sudo tee /etc/glouton/conf.d/99-crowdsec.conf
metric:
  prometheus:
    targets:
      - url: "http://127.0.0.1:6060/metrics"
        name: crowdsec
  allow_metrics:
    - cs_active_decisions
    - cs_alerts
    - cs_bucket_overflowed_total
    - cs_bucket_underflowed_total
    - cs_parser_hits_ok_total
    - process_start_time_seconds
EOF
Custom dashboard
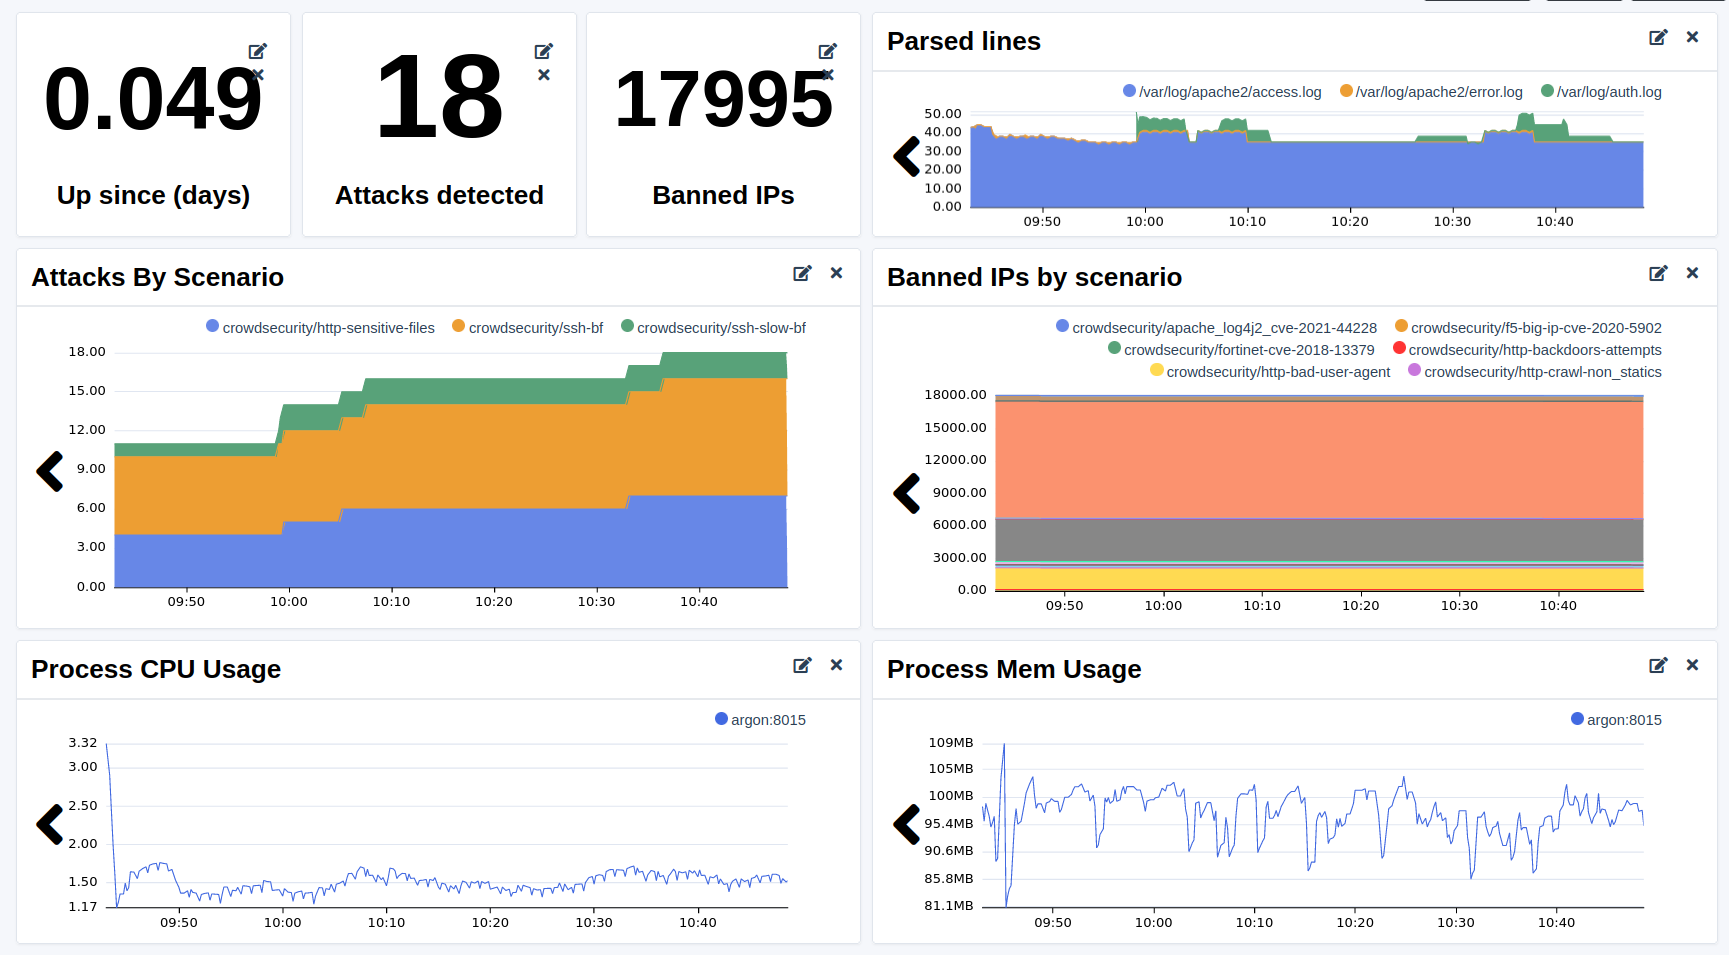
Create a new custom dashboard. We will use widgets with the Advanced mode to be able to write PromQL queries.
Here are some PromQL queries you can add to your dashboard:
- Up since (days)
(time() - (process_start_time_seconds{scrape_job="crowdsec"}))/60/60/24- Number of attacks detected
sum(cs_alerts{scrape_job="crowdsec"})- Number of banned IPs (including the Central API decisions)
sum(cs_active_decisions{scrape_job="crowdsec",action="ban"})- Number of lines parsed per minute
sum(rate(cs_parser_hits_ok_total{scrape_job="crowdsec"}[$__rate_interval])) by (source) * 60- Number of attacks by scenario
cs_alerts{scrape_job="crowdsec"}- Number of banned IPs by scenario (including the Central API decisions)
sum(cs_active_decisions{scrape_job="crowdsec",action="ban"}) by (reason)- Process CPU usage
rate(process_cpu_seconds_total{scrape_job="crowdsec"}[$__rate_interval])*100- Process memory usage
process_resident_memory_bytes{scrape_job="crowdsec"}Don’t forget to disable the simulation mode and to restore the whitelist after testing.
sudo cscli simulation disable --global
sudo cscli parsers add crowdsecurity/whitelists
sudo systemctl reload crowdsec