 Published on 07 May 2019 by Camille Eid-Centenero
This article is a follow up of our previous article where we explained how we deployed a Kubernetes cluster with k3s on a Raspberry Pi cluster.
Installing, configuring and accessing applications
In this blog post we are going to cover the kubernetes installation of:
- Nginx web server
- PostgreSQL database
- Redis system
- Quote application
- Bleemeo agent
First we should install docker on all nodes so after taking ssh access on each node, install docker on it with the following commands:
$ sudo apt-get update && sudo apt-get upgrade

$ sudo apt-get install docker.io
Traefik
K3S by default comes with Traefik ingress controller with the Traefik-dashboard. Here is what the Traefik-dashboard looks like on a fresh deployment:
Nginx
The Nginx server will be our first entry to our online app. Firstly, we made the ConfigMap where we've put the uWSGI app (Quote) parameters for the Quote app.
To deploy the Nginx server run:
$ k3s kubectl apply -f nginx_configmap.yaml
apiVersion: v1
kind: ConfigMap
metadata:
  name: nginx-conf
data:
  default.conf: |
    upstream django {
      server quote:8181;
    }
    server {
        listen      80;
        listen      443;
        server_name quote.bleemeo.com;
        charset     utf-8;
        location / {
            include uwsgi_params;
            uwsgi_pass django;
            uwsgi_param HTTPS off;
            uwsgi_param UWSGI_SCHEME http;
            proxy_redirect off;
            proxy_set_header Host $host;
            proxy_set_header X-Real-IP $remote_addr;
            proxy_set_header X-Forwarded-For $proxy_add_x_forwarded_for;
            proxy_set_header X-Forwarded-Host $server_name;
            proxy_set_header X-Forwarded-Proto http;
        }
        location /nginx_status {
            stub_status on;
        }
      }
After that you can apply the deployment of the Nginx server present right here:
$ kubectl apply -f nginx_deploy.yaml
apiVersion: apps/v1
kind: Deployment
metadata:
  name: my-nginx
spec:
  selector:
    matchLabels:
      run: my-nginx
  replicas: 2
  template:
    metadata:
      labels:
        run: my-nginx
    spec:
      containers:
        - name: my-nginx
          image: nginx:1.15.10
          ports:
            - containerPort: 80
          volumeMounts:
            - mountPath: /etc/nginx/conf.d
              name: config-volume
      volumes:
        - name: config-volume
          configMap:
            name: nginx-conf
      restartPolicy: Always
And to finish with the web server you can apply the service and the ingress of the Nginx app. This service needs an ingress with the host "quote.bleemeo.com" to be contacted from the rest of the world.
$ kubectl apply -f nginx_svc.yaml
apiVersion: v1
kind: Service
metadata:
  name: my-nginx
  labels:
    run: my-nginx
spec:
  ports:
  - port: 80
    protocol: TCP
  selector:
    run: my-nginx
spec:
  ports:
  - port: 80
    protocol: TCP
  selector:
    run: my-nginx
---
apiVersion: extensions/v1beta1
kind: Ingress
metadata:
  name: my-nginx
spec:
  rules:
  - host: quote.bleemeo.com
    http:
      paths:
      - backend:
          serviceName: my-nginx
          servicePort: 80
PostgreSQL
We have here one constraint that consists to assign a pod to a node, this pod was the PostgreSQL pod. We should assign it to the third node. This constraint will demonstrate a part of the project. In this specific case if the third node failed, the entire application does not work anymore. We have just followed the Kubernetes tutorial present right here to do that:
https://kubernetes.io/docs/tasks/configure-pod-container/assign-pods-nodes/
So we now decide to put to the third node a disktype:
$ kubectl label nodes <NODE_NAME> disktype=ssd
And add this two lines at the end of the StatefulSet file of the PostgreSQL application like this:
    nodeSelector:
      disktype: ssd
This two lines realize a node selection. The PostgreSQL application will select the node where the type of the disk is "ssd" and previously we just also put on the third node the "ssd" disktype. In other words the PostgreSQL app will only be running on the third node.
To create your PostgreSQL database on Kubernetes please apply the following ConfigMap, Service and StatefulSet:
$ kubectl apply -f postgres_configmap_svc.yaml
apiVersion: v1
kind: ConfigMap
metadata:
  name: postgres-config
  labels:
    app: postgres
data:
  POSTGRES_DB: <DATABASE_NAME>
  POSTGRES_USER: <DB_USER>
  POSTGRES_PASSWORD: <USER_PASSWD>
---
apiVersion: v1
kind: Service
metadata:
  name: postgres
  labels:
    app: postgres
spec:
  type: ClusterIP
  ports:
    - port: 5432
  selector:
    app: postgres
Now please apply the StatefulSet of postgres:
$ kubectl apply -f postgres_sts.yaml
apiVersion: apps/v1
kind: StatefulSet
metadata:
  name: postgres
spec:
  selector:
    matchLabels:
      app: postgres
  serviceName: "postgres"
  replicas: 1
  template:
    metadata:
      labels:
        app: postgres
    spec:
      containers:
        - name: postgres
          image: postgres:10.4
          imagePullPolicy: "IfNotPresent"
          ports:
            - containerPort: 5432
          envFrom:
            - configMapRef:
                name: postgres-config
          volumeMounts:
            - mountPath: /var/lib/postgresql/data
              name: postgresdb
      volumes:
        - name: postgresdb
          hostPath:
            path: /mnt/data
            type: DirectoryOrCreate
      nodeSelector:
        disktype: ssd
Redis
The role of Redis in our infrastructure is to have a 5 seconds cache between our query to the quote application. This cache will keep the result of a query since 5 seconds to avoid to make a lot of useless queries in a short time. Here is the apply of the Redis Deployment and StatefulSet:
$ kubectl apply -f redis_svc_sts.yaml
apiVersion: v1
kind: Service
metadata:
  name: redis
  labels:
    app: redis
spec:
  type: ClusterIP
  ports:
   - port: 6379
  selector:
   app: redis
---
apiVersion: apps/v1
kind: StatefulSet
metadata:
  name: redis
spec:
  selector:
    matchLabels:
      app: redis
  serviceName: "redis"
  replicas: 1
  template:
    metadata:
      labels:
        app: redis
      annotations:
        bleemeo.stack: quote
    spec:
      containers:
        - name: redis
          image: redis:5.0.4
          ports:
- containerPort: 6379
The hosts file
Don't forget to add the name of your server to contact it with the IP of your control plane node in your hosts (/etc/hosts) file like this:

Thanks to this line you can now join the Nginx server with his domain name "quote.bleemeo.com" instead of his IP address.
Monitoring The Quote app with the Bleemeo
Bleemeo published the quote app and on the docker hub (https://hub.docker.com/r/bleemeolabs/quote). The container is available for amd64 and arm architectures (we are deploying on Raspberry Pi). In other words you just have to apply the followings Deployment and Services to grab the quote app and the Bleemeo agent on your Kubernetes architecture thanks to the hub registry of docker.
To monitor with Bleemeo, you need to signup, and you can try it for free as you will get a 30€ credits at signup. After signup, you will get credentials you will need to perform the bleemeo agent installation. After the setup, all dashboards will be created automatically and a load generator will be deployed to demonstrate how Bleemeo track scaling on a Kubernetes cluster.
We are going to begin with quote before install the Bleemeo agent. So you can run the following command to deploy quote.
$ kubectl apply -f quote_deploy.yaml
apiVersion: extensions/v1beta1
kind: Deployment
metadata:
  labels:
    run: quote
  name: quote
spec:
  replicas: 1
  selector:
    matchLabels:
      run: quote
  template:
    metadata:
      labels:
        run: quote
    spec:
      containers:
        - image: bleemeolabs/quote:latest-arm
          imagePullPolicy: IfNotPresent
          name: quote
          env:
            - name: DJANGO_SETTINGS_MODULE
              value: "bleemeo_quote.settings.production"
            - name: DJANGO_DATABASE_PASSWORD
              value: "your_password"
---
apiVersion: v1
kind: Service
metadata:
  labels:
    run: quote
  name: quote
spec:
  selector:
    run: quote
  ports:
    - port: 8181
      protocol: TCP
      targetPort: 8181
  sessionAffinity: None
  type: ClusterIP
Now we want to deploy Bleemeo agent, the yaml file is available at this link:
https://github.com/bleemeo/glouton/blob/main/k8s.yaml
Be aware that you need to download and configure this file before applying it!
you can use :
$ wget https://github.com/bleemeo/glouton/blob/main/k8s.yaml
to grab the file before configure it.
You should put your Bleemeo agent credentials and registration key. These credentials are given when you make an account on our website: bleemeo.com
We have also modified this file to activate statd and prometheus. We have changed the image to run the arm Bleemeo agent. The multi-arch app will be available soon, and so you will don't need to modify the .yaml to run the arm image. Once you add your creds you can now apply the file with the same command as usual:
$ kubectl apply -f k8s.yaml
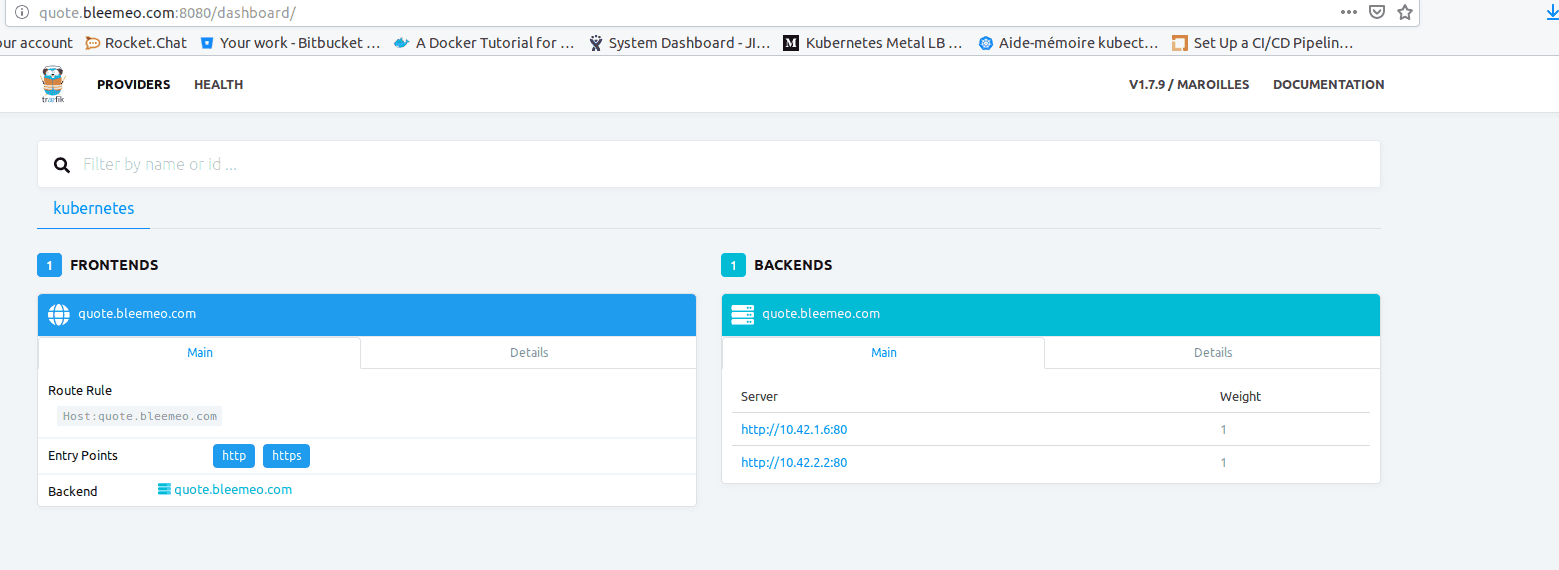
So on this screenshot you can see that the Nginx server, the PostgreSQL instance, quote app and the Redis services are running as service (we definitely not see "running" but I promise that they really are and that's working).

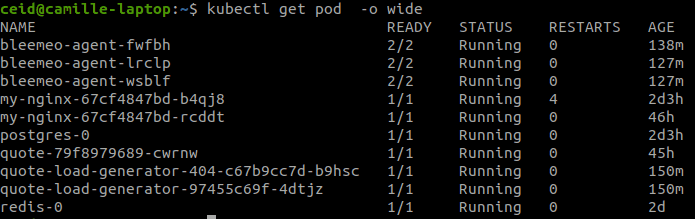
So all the services are running and then let's observe the kube pods right now:
It is possible that pods can not talk with each other due to the use of docker in this context. To realize a sort of overlay between pods and authorize the exchange of data please add the different routes between pods.
Here is the final goal, the quote application is running.

So now we can access to the Traefik-dashboard with the URL: "quote.bleemeo.com:8080/dashboard", the kubernetes-dashboard with the URL given previously and the final application with "quote.bleemeo.com".
To increase and improve the representation of the results on our agent we decide to add a load generator in order to see better traces on graphics. So here is our configuration for the quote load generator and the "error-404" load generator: You can apply it with the commands:
$ kubectl apply -f loadgen_deploy.yaml
apiVersion: apps/v1
kind: Deployment
metadata:
  labels:
    run: quote-load-generator
  name: quote-load-generator
spec:
  replicas: 1
  selector:
    matchLabels:
      run: quote-load-generator
  template:
    metadata:
      labels:
        run: quote-load-generator
    spec:
      containers:
        - image: bleemeolabs/quote:latest-arm
          imagePullPolicy: IfNotPresent
          name: quote
          args:
            - python3
            - generate_load.py
            - --address=traefik.kube-system
$ kubectl apply -f loadgen_error_deploy.yaml
apiVersion: apps/v1
kind: Deployment
metadata:
  labels:
    run: quote-load-generator-404
  name: quote-load-generator-404
spec:
  replicas: 1
  selector:
    matchLabels:
      run: quote-load-generator-404
  template:
    metadata:
      labels:
        run: quote-load-generator-404
    spec:
      containers:
        - image: bleemeolabs/quote:latest-arm
          imagePullPolicy: IfNotPresent
          name: quote
          args:
            - python3
            - generate_load.py
            - --address=traefik.kube-system
            - --path=/404
            - --delay=5
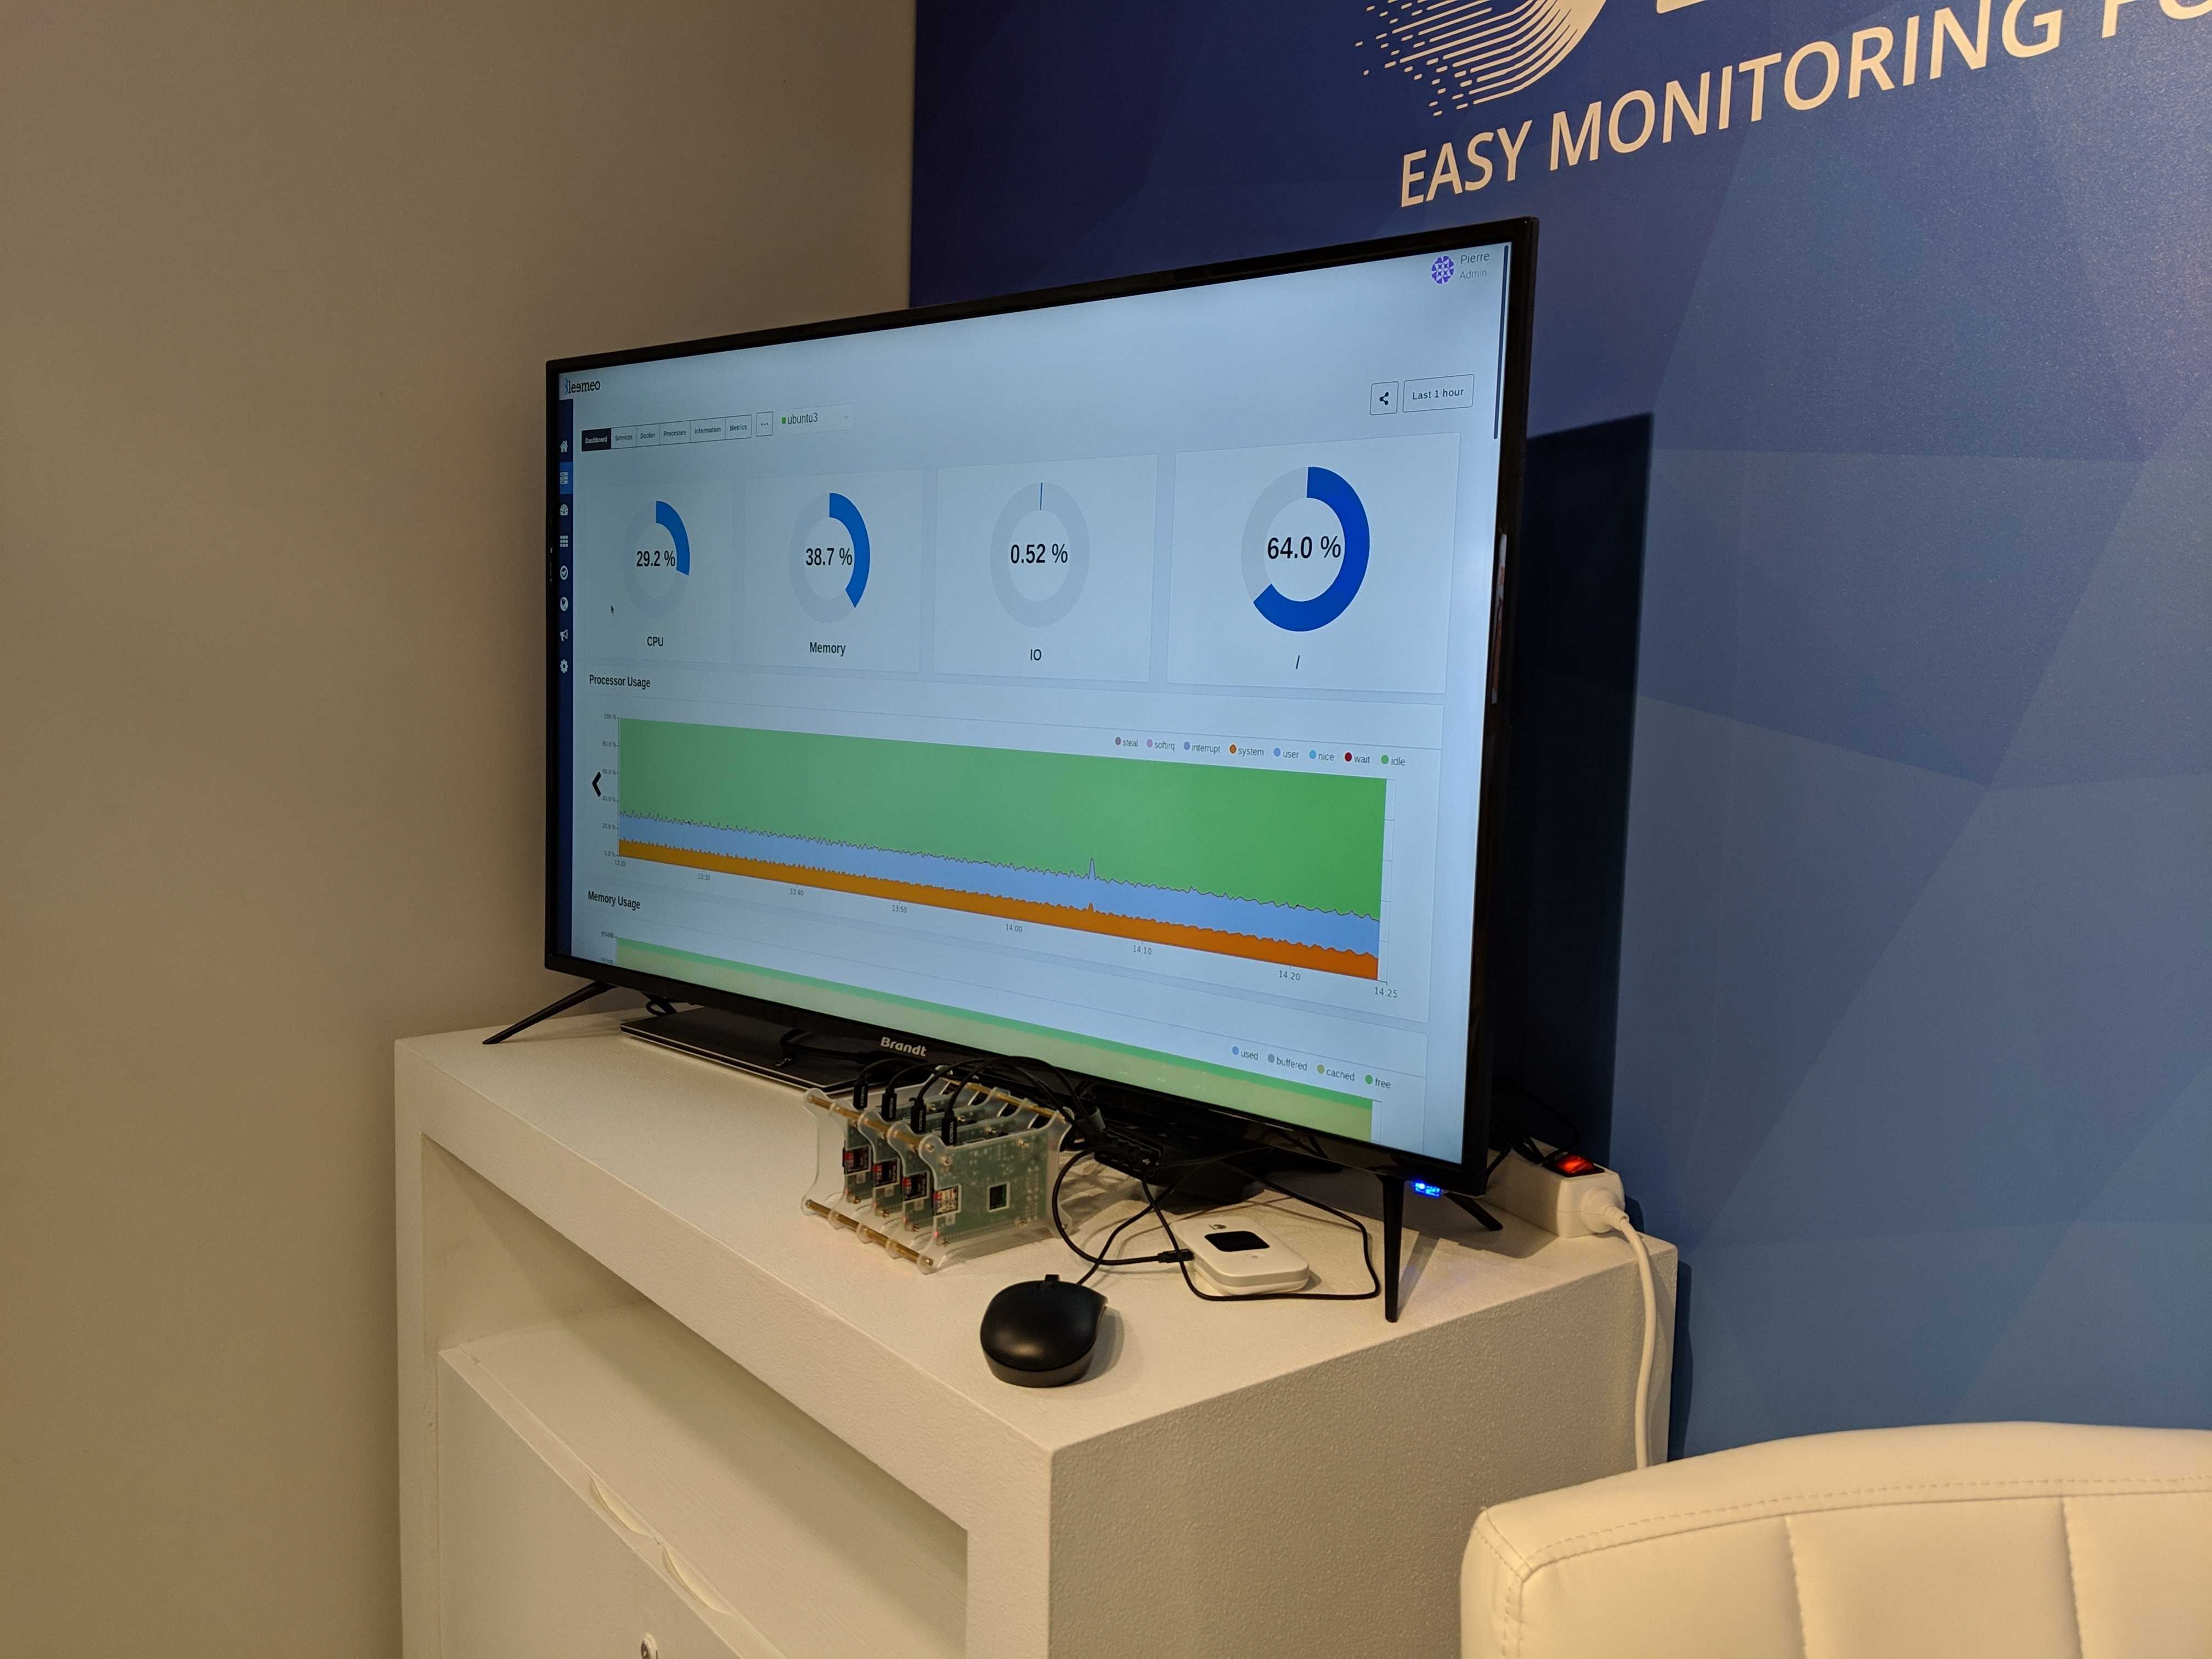
At this point you can see the final tool in use with the smart Bleemeo agent deployed on each nodes of the cluster running on a TV screen. This picture was taken a the 8th Devoxx conference which took place from the 16th to the 19th April 2019.
Thanks to the load generator combined with a cron command, we can clearly observe the impact of an important load or error request on a website. The cron command helps us to make queries every 30 minutes.
