 Published on 17 August 2016 by Lionel Porcheron

Why using a chat internally?
Even in our small team, having a team chat has great benefits:
- we share/broadcast information to the whole team without disturbing individuals
- we historize what we discussed and search in the history
- you copy/paste code snippets or links to your team mates
- you discuss with your team whether you are at the same location or traveling
- all notifications go though a chat channel your team is free to join or not instead of filling your mailbox
Why to move from XMPP to Rocket.chat?
We have been happy users of XMPP (eJabberd on the server side and Pidgin on the client side) for years. It works quite well, it is robust, it consumes few resources and it is a standard. But sadly, we have identified some drawbacks:
- no easy integration with other services. You can use a bot, but you have to do a lot by yourself.
- server development (even if eJabberd made great progress in the last two years) is slow.
- client side is our biggest deception: my mobile client (Conversation) is much better than my desktop. And nobody is really investing in this area those days.
After evaluating a couple of solutions: Mattermost, Slack, Rocket.chat, we decided to use Rocket.chat. They got an easy way to bootstrap with their Docker images, and we were able to integrate the service with our development stack. We have an Open Source culture, a couple of "spare" servers, so Rocket.chat was perfect for us. Slack seems to be a very common choice those days :).
Rocket.chat deployment
We deploy our Rocket.chat using Docker and docker-compose just like the rest of our tools (that may change in the future with Docker 1.12 and services, but for the moment, we are still using our compose files to describe our stack: containers, networks and volumes).
Basically, our docker-compose file looks like this:
version: '2'

services:

  mongo:
    image: mongo
    command: mongod --smallfiles --oplogSize 128

  rocketchat:
    image: rocketchat/rocket.chat:latest
    environment:
      - PORT=3000
      - ROOT_URL=https://chat.bleemeo.work
      - MONGO_URL=mongodb://mongo:27017/rocketchat
    labels:
      - traefik.backend=chat
      - traefik.frontend.rule=Host:chat.bleemeo.work
      - traefik.port=3000

# hubot, the popular chatbot (add the bot user first and change the password before starting this image)
  hubot:
    image: rocketchat/hubot-rocketchat:latest
    environment:
      - ROCKETCHAT_URL=http://rocketchat:3000
      - ROCKETCHAT_ROOM=
      - ROCKETCHAT_USER=bot
      - ROCKETCHAT_PASSWORD=mybotpassword
      - BOT_NAME=bot
      - LISTEN_ON_ALL_PUBLIC=true
      - RESPOND_TO_DM=true
      - RESPOND_TO_EDITED=true
      - EXTERNAL_SCRIPTS=hubot-help,hubot-seen,hubot-links,hubot-diagnostics,hubot-shipit,hubot-maps,hubot-youtube
    labels:
      - traefik.backend=hubot
      - traefik.frontend.rule=Host:hubot.bleemeo.work
      - traefik.port=8080
That's mostly the same docker-compose file provided by the Rocket.Chat project in their documentation, with some small changes:
- we added some labels to connect to Traefik. Check our previous blog post on how we deploy our internal tools with Traefik.
- we added our URLs
- on the hubot stuff: we allowed the bot to communicate on all public
channels (
LISTEN_ON_ALL_PUBLIC=true) to respond direct messages (RESPOND_TO_DM=true) and also when a message is edited (when you press key up and update your message, in Rocket.Chat you don't send a new message but edit your message).
We will discuss external integrations later in this blog post. We
activate some additional hubot plugins: hubot-shipit, hubot-maps,
hubot-youtube. Honestly, this is pure fun, and we will go in details
on the serious stuff later.
Let's start our instance:
docker-compose up
When the instances is started, you get a banner in your terminal:
rocketchat_1  | ➔ System ➔ startup
rocketchat_1  | ➔ +-------------------------------------------+
rocketchat_1  | ➔ |               SERVER RUNNING              |
rocketchat_1  | ➔ +-------------------------------------------+
rocketchat_1  | ➔ |                                           |
rocketchat_1  | ➔ |       Version: 0.36.0                     |
rocketchat_1  | ➔ |  Process Port: 3000                       |
rocketchat_1  | ➔ |      Site URL: https://chat.bleemeo.work  |
rocketchat_1  | ➔ |                                           |
rocketchat_1  | ➔ +-------------------------------------------+
You can connect to your chat with your favorite browser. The first registered user will be administrator of your instance.
Configuration Adjustments
After login as administrator, you can go in Administration and update your configuration. For our internal chat, we want to:
- connect our Rocket.Chat instance to our LDAP directory
- disable external registrations on the instance
- update branding to match our corporate colors :)
Here are the steps and screenshots for performing our customization.
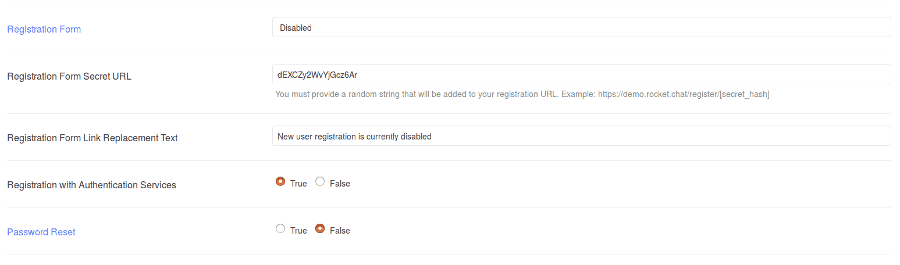
Go into Administration, Accounts, Registration:
- disable Registration Form
- set Password Reset to False (as we will be using LDAP)
Go into Administration, Assets, Logo:
- update your logo
![]()
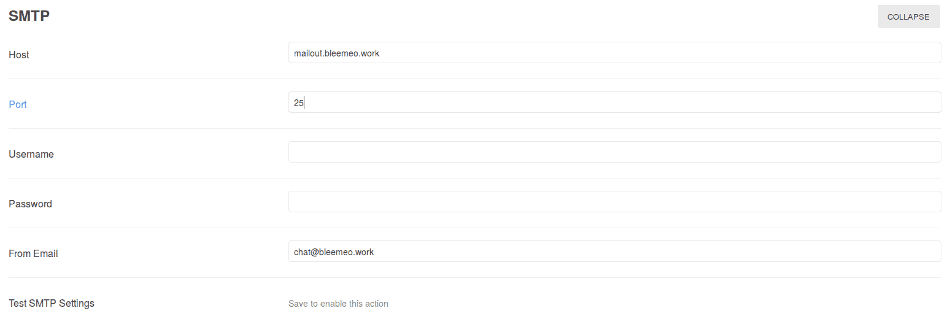
Go into Administration, Email:
- set smtp, port and mail from
Go into Administration, General:
- set Site Name

Go into Administration, LDAP:
- set Host to ldap.bleemeo.work
- set Domain Base to dc=bleemeo,dc=work
- set Domain Search User ID to uid
- set Domain Search Object Class to inetOrgPerson
- set Domain Search Object Category to empty
- set Sync Data to True
- set Sync User Avatar

Bot Account Creation
If you have not created an account for your bot yet, it is time to do so. Account can be a local Rocket.Chat user or an LDAP account. Once created, you have to restart your bot to connect-it. Bot will join the "#general" channel. To restart your bot, just restart the container:
docker-compose restart hubot
You should see your bot connecting.
Integrations
In next articles, we will integrate our Rocket.chat to:
- Bitbucket using https://rocket.chat/docs/administrator-guides/integrations/bitbucket
- JIRA using https://rocket.chat/docs/administrator-guides/integrations/jira
- Sentry using https://rocket.chat/docs/administrator-guides/integrations/sentry
- Jenkins